In this tutorial we’ll be going through the setup process to get SDL working with C# and .NET 6, so that in later on tutorials we can use C# to develop a simple, portable, cross platform game.
Prerequisites
You’ll need the following installed or downloaded in order to progress through the tutorial. If you’re on Windows, you can simply use the Sayers.SDL2.Core NuGet package that we will be adding as a step in this tutorial. For other platforms you’ll need get the Development Libraries from the links below and download either the Development Libraries with a type of (Visual C++ 32/64-bit) or even just the Runtime Binaries for your system (32 bit vs 64bit) since we’ll just be using the output dlls from them.
- Visual Studio 2022 Community Edition or Higher
- .NET 6
- Sayers.SDL2.Core
These are only needed if you’re on a platform other than x64 Windows. - SDL 2.0.20 Development Libraries (we’ll just be using the dlls luckily!)
- SDL_image 2.0.5 Development Libraries
- SDL2-CS (these are the actual C# bindings we’ll be using)
As always, the source code for this tutorial can be found on Github here: https://github.com/JeremySayers/SDL2-CS-Tutorial
Visual Studio Setup
Once you have all the above downloaded, start by running through the installers for Visual Studio followed by .NET6.0 if you don’t already have them installed.
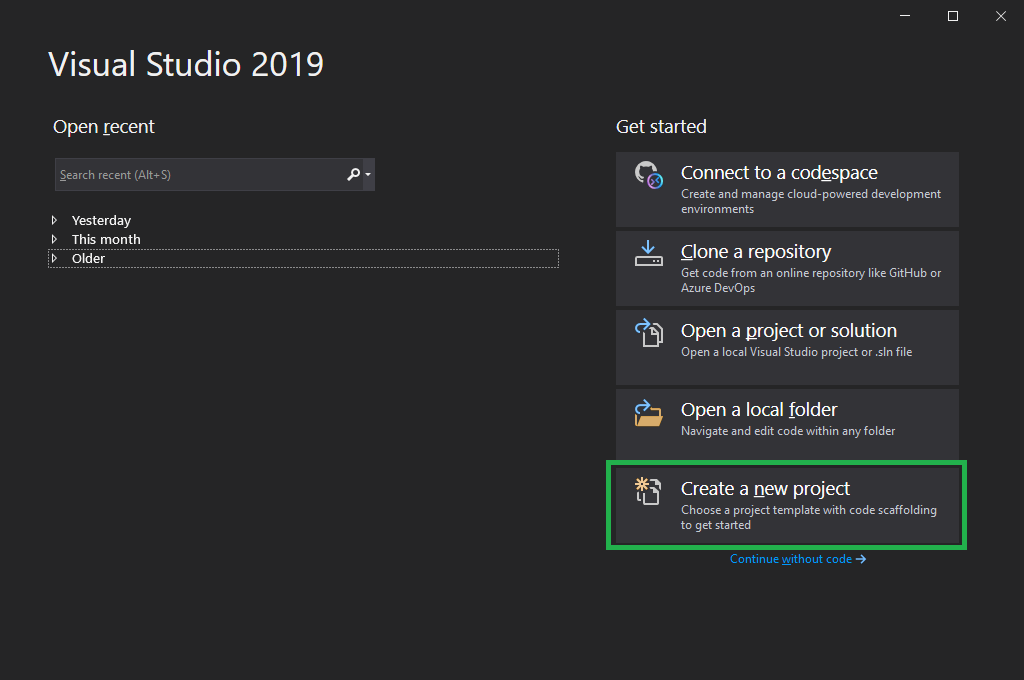
Next fire up Visual Studio and select Create a new project
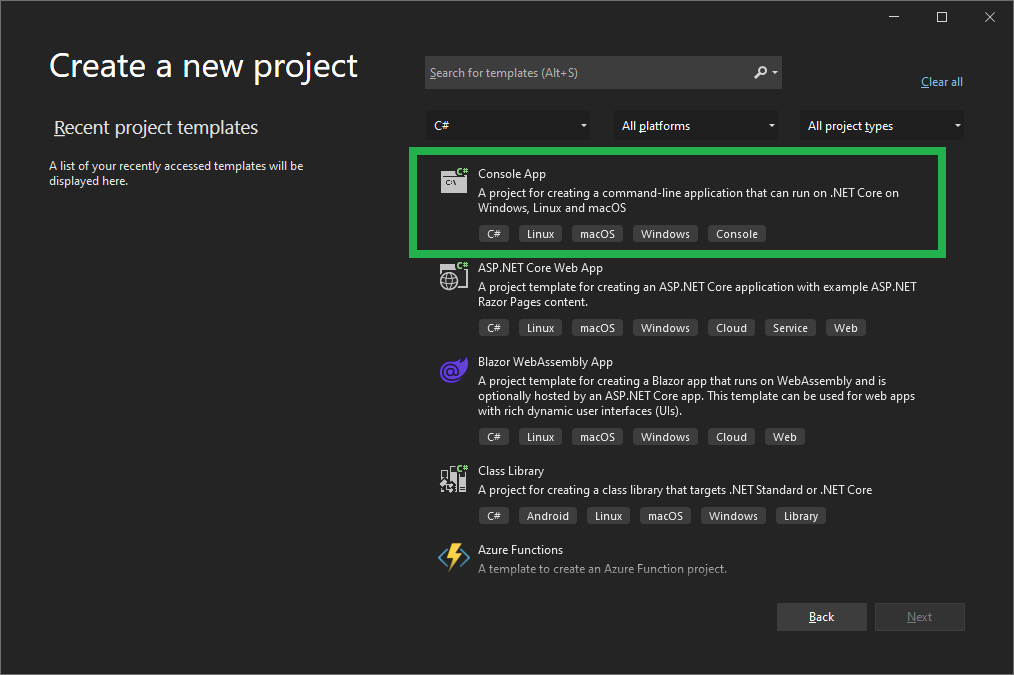
On the following Create a new project screen, select the Console App template, making sure that it is the C# variant that specifically mentions .NET Core in the description.
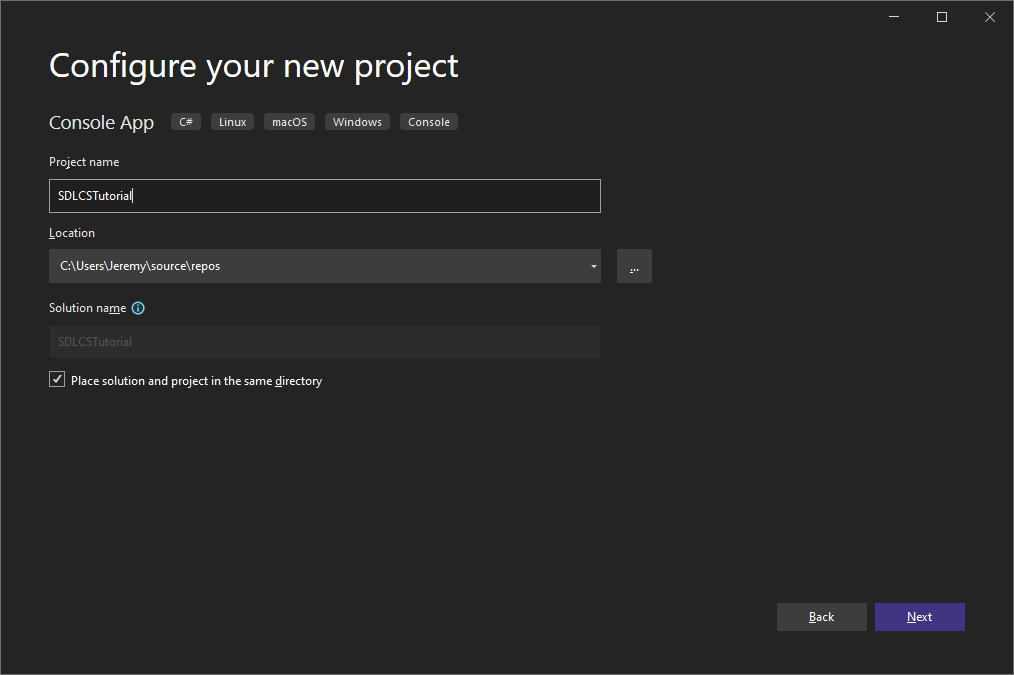
Give your project a name and select the location where you would like it to be stored and then select Create
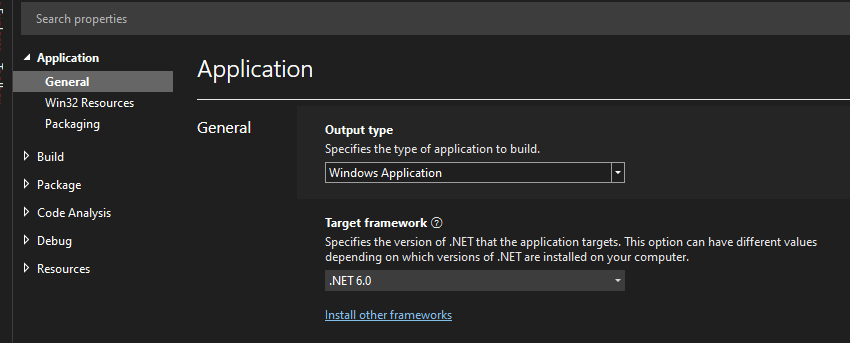
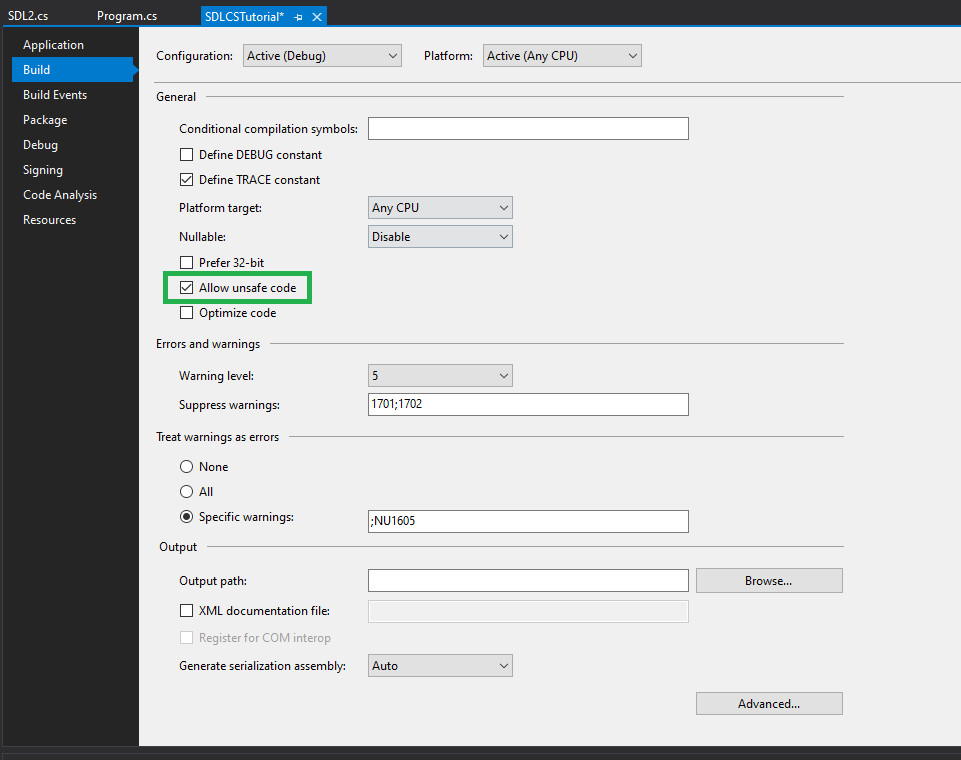
Once our project has been created, you’ll be greeted with the familiar blank canvas that is the C# Console Application template, but before we jump in we need to change a few things. The first of which is setting the the Target Framework to .NET 6.0 and setting the Output type to Windows Application. Both of these can be found by right clicking on your project, selecting Properties and then selecting the Application tab on the left. Save the changes with Ctrl + S.
While you’re in the project properties you will also need to check Allow unsafe code so that we can utilize the SDL dlls:
SDL2 NuGet Setup (Windows x64 Only)
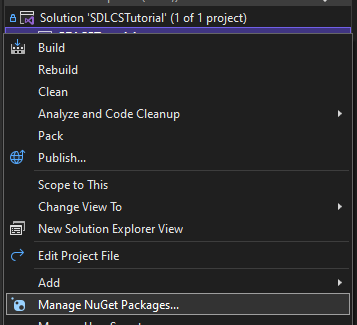
If you’re on x64 Windows then you’re in luck! In Visual Studio you can right click on your project and select Manage NuGet Packages
Then hit the Browse tab and search for Sayers.SDL2.Core. The current version is 1.0.11 and has the native DLLs for SDL version 2.0.20. Finally click Install and then OK on the Preview Changes window that pops up next.

With the NuGet package added you can skip both Setup the SDL DLLs and Getting the SDL2-CS Bindings in Place sections below and head straight to Putting it all Together!
Setup the SDL DLLs (Not Needed with NuGet Package)
In order for your project to work with the SDL libraries, we need to put the DLLs somewhere that your executable will find them. The easiest way is to place them in the output directory of your project, which is how you would “ship” your game. The downside to this is that if you Clean the solution, it will wipe out your output directly and you’ll have to re copy them over. For now we’ll show the easy way and I’ll put together a dedicated post on the different methods of dealing with this.
First build the solution so that we can generate our output folder structure. Start by going to Build and then Build Solution

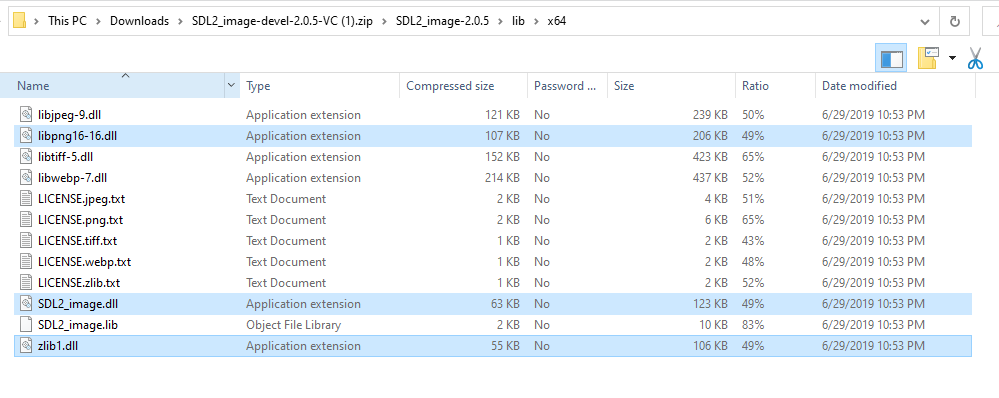
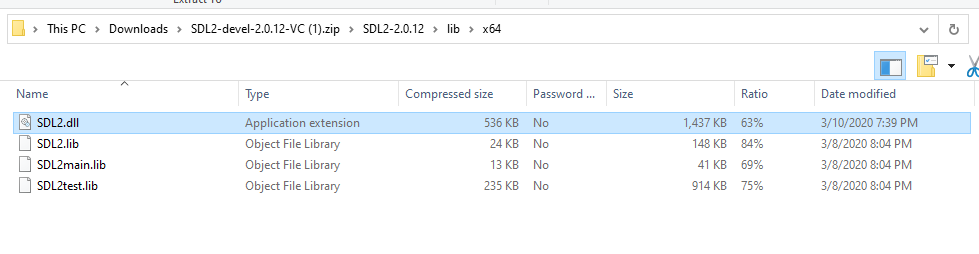
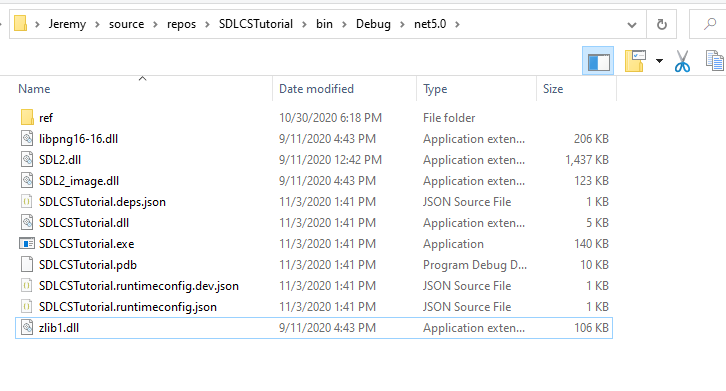
Now open up an instance of File Explorer and head to your project root and then traverse down to [Project Root] > bin > Debug > net6.0 and copy over these dlls from your SDL_image and SDL development library downloads: libpng16-16.dll, SDL2_image.dll, zlib1.dll, and SDL2.dll into your projects net5.0 folder.
The net6.0 folder of your project should now look similar to this, notice how your projects executable (in this case “SDLCSTutorial.exe”) and the copied dlls are all in the same folder.
Getting the SDL2-CS Bindings in Place (Not Needed with NuGet Package)
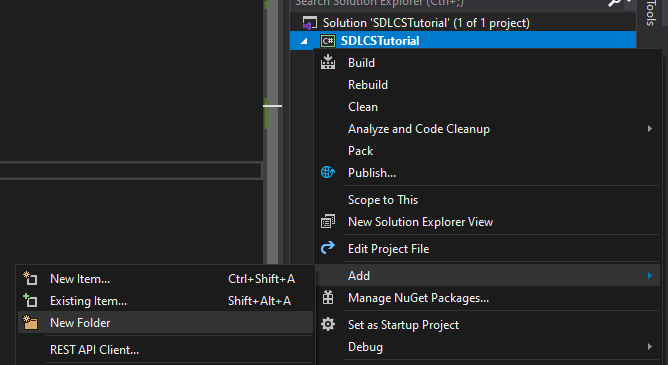
Now we need to get the SDL2-CS bindings in place and ready to use. Head back over to Visual Studio and right click on your project and select Add > New Folder and name it SDL2.
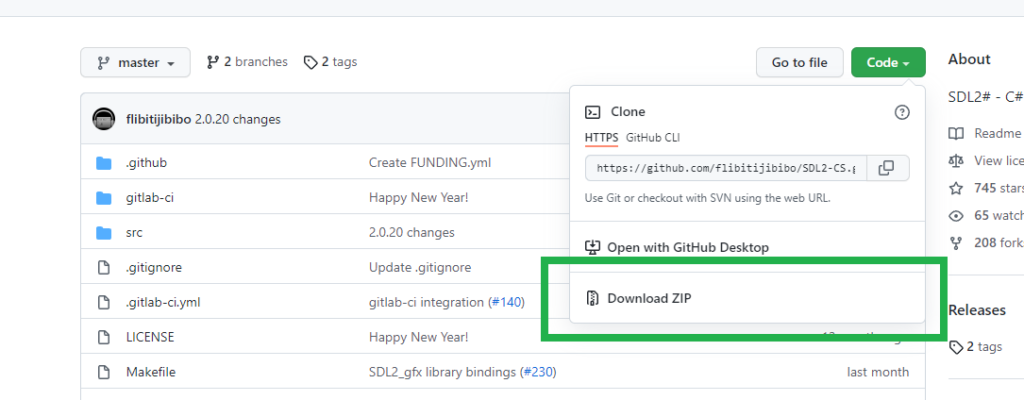
Next copy the 4 .cs files from the SDL2-CS repo (https://github.com/flibitijibibo/SDL2-CS) into the folder you’ve just created. Make sure you’re using the latest and not any of the out of date nuget packages, since they’re missing some bindings that I had added to the SDL2-CS project recently. The easiest way to download the 4 required .cs files is to go to the above repository link and then select Code > Download as Zip
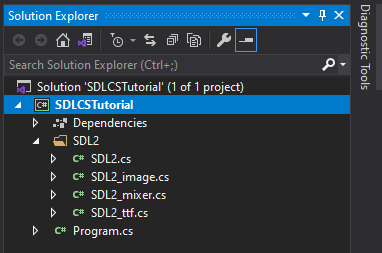
Once you’ve downloaded the zip of the repository and added the 4 files to your solution, it should look something like this the tree below. I’ve had a few people reach out to me about this step, and if you’re having any trouble, you can take a look at the source for the tutorial or even download it and work from it: https://github.com/JeremySayers/SDL2-CS-Tutorial. Keep in mind that you’ll still need to copy over the dlls into the output directory if you use the above source as a starting point.
Putting it all Together
Finally to make sure everything is setup correctly copy and paste the following as your Program.cs (making sure to have a using for SDL2). We won’t go over what each of these pieces of code do in this tutorial, as that’s the content for the next one, but this will ensure that everything is setup correctly and working.
using SDL2;
using System;
// Initilizes SDL.
if (SDL.SDL_Init(SDL.SDL_INIT_VIDEO) < 0)
{
Console.WriteLine($"There was an issue initilizing SDL. {SDL.SDL_GetError()}");
}
// Create a new window given a title, size, and passes it a flag indicating it should be shown.
var window = SDL.SDL_CreateWindow("SDL .NET 6 Tutorial", SDL.SDL_WINDOWPOS_UNDEFINED, SDL.SDL_WINDOWPOS_UNDEFINED, 640, 480, SDL.SDL_WindowFlags.SDL_WINDOW_SHOWN);
if (window == IntPtr.Zero)
{
Console.WriteLine($"There was an issue creating the window. {SDL.SDL_GetError()}");
}
// Creates a new SDL hardware renderer using the default graphics device with VSYNC enabled.
var renderer = SDL.SDL_CreateRenderer(window,
-1,
SDL.SDL_RendererFlags.SDL_RENDERER_ACCELERATED |
SDL.SDL_RendererFlags.SDL_RENDERER_PRESENTVSYNC);
if (renderer == IntPtr.Zero)
{
Console.WriteLine($"There was an issue creating the renderer. {SDL.SDL_GetError()}");
}
// Initilizes SDL_image for use with png files.
if (SDL_image.IMG_Init(SDL_image.IMG_InitFlags.IMG_INIT_PNG) == 0)
{
Console.WriteLine($"There was an issue initilizing SDL2_Image {SDL_image.IMG_GetError()}");
}
var running = true;
// Main loop for the program
while (running)
{
// Check to see if there are any events and continue to do so until the queue is empty.
while (SDL.SDL_PollEvent(out SDL.SDL_Event e) == 1)
{
switch (e.type)
{
case SDL.SDL_EventType.SDL_QUIT:
running = false;
break;
}
}
// Sets the color that the screen will be cleared with.
if (SDL.SDL_SetRenderDrawColor(renderer, 135, 206, 235, 255) < 0)
{
Console.WriteLine($"There was an issue with setting the render draw color. {SDL.SDL_GetError()}");
}
// Clears the current render surface.
if (SDL.SDL_RenderClear(renderer) < 0)
{
Console.WriteLine($"There was an issue with clearing the render surface. {SDL.SDL_GetError()}");
}
// Switches out the currently presented render surface with the one we just did work on.
SDL.SDL_RenderPresent(renderer);
}
// Clean up the resources that were created.
SDL.SDL_DestroyRenderer(renderer);
SDL.SDL_DestroyWindow(window);
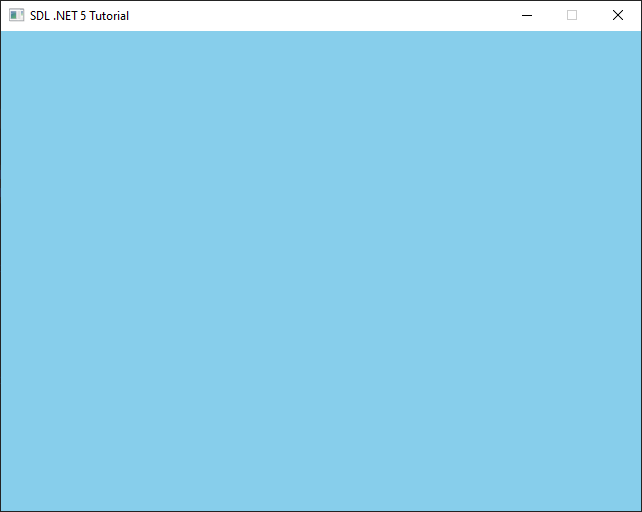
SDL.SDL_Quit();Now run your program and if you see this then congratulations you’re setup and ready to go! If you have any questions or issues feel free to leave a comment down below and Part 2 is live now here: Part 2 – Creating a Window.
Common Issues and Troubleshooting
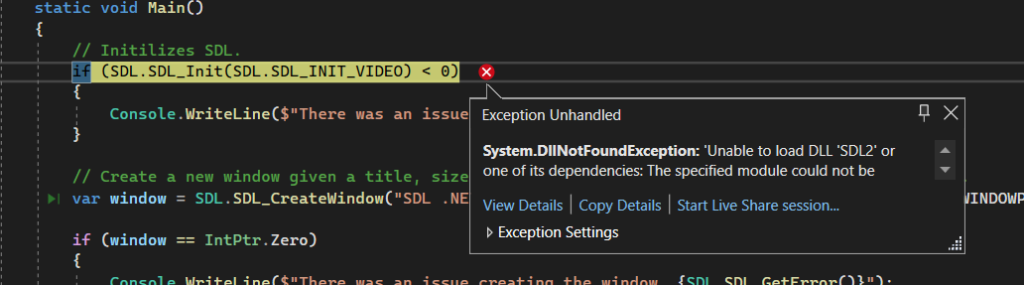
If you see a System.DllNotFoundException then one or more of the dlls required are not in your output folder. Head back up to the Setup the SDL DLLs section above and verify that you’ve copied them all.
Another common issue I’ve seen is an error of 'SDL_image' does not contain a definition for 'IMG_GetError'. This is caused by not having the latest SDL2-CS bindings (either using an out of date copy, or using the old abandoned nuget packages). Make sure you’ve downloaded the latest bindings and copied over their files.

This was VERY HELPFUL.
It doesn’t work for me 🙁 I downloaded all files you ordered to download and put them where they should be (even this wasn’t obvious because websites of SDL and SDL image have 6(!) links with downloadable content) and C# just doesn’t see SDL library. If the reason is that I need to install plain SDL and SDL image somehow, I don’t know how to do it.. I watched “How to set up SDL2 with Visual Studio 2021 EASY C/C++” tutorial at a YouTube channel Jacob with “instalation” of SDL for C++ and it worked for C++ (but I needed to follow an advice from comments…) but I cannot do the same for C#, because properties of a C# project look completly different 🙁 Could you help me somehow? If need to install SDL and SDL Image could you write how to do it (their official websites don’t explain it, at least in easy to understand way 🙁 )
I’ve updated the section on the development libraries to hopefully clarify this. You can either download the `Development Libraries` or the `Runtime Binaries` at the links provided, because we only need the dlls from them. Let me know if the clarification above isn’t sufficient and I can take another look!
Ok, I was helped at the Discord Channel of SDL. It turned out that it sufficed to install SDL2-CS.NetCore with nuget packages manager. But C# had a problem with SDL_image.IMG_GetError(). It didn’t understand this method. I had to change it for SDL.SDL_GetError(). Do you have an idea why?
P.S. Are you planning to make next parts of your tutorial? Please do it. There are vitually no tutorials for SDL for C# in the internet. 🙁
Hey PLrc! I’ve since updated the post to hopefully clear up any of the issues you’re having. The reason why you’re getting an error that `SDL_image.IMG_GetError()` doesn’t exist is because you’re using one of the out of date nuget packages. As far as I know there are no currently maintained nuget packages for SDL2-CS, so the version you were using was missing that binding. I’ve expanded on the process above for downloading and copying over the bindings. If you’re still having issues, feel free to download the source from https://github.com/JeremySayers/SDL2-CS-Tutorial and then just follow the copying over the dlls section above.